
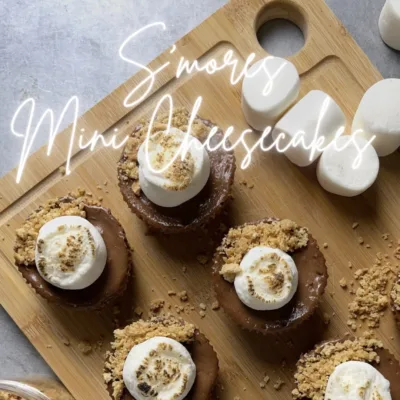
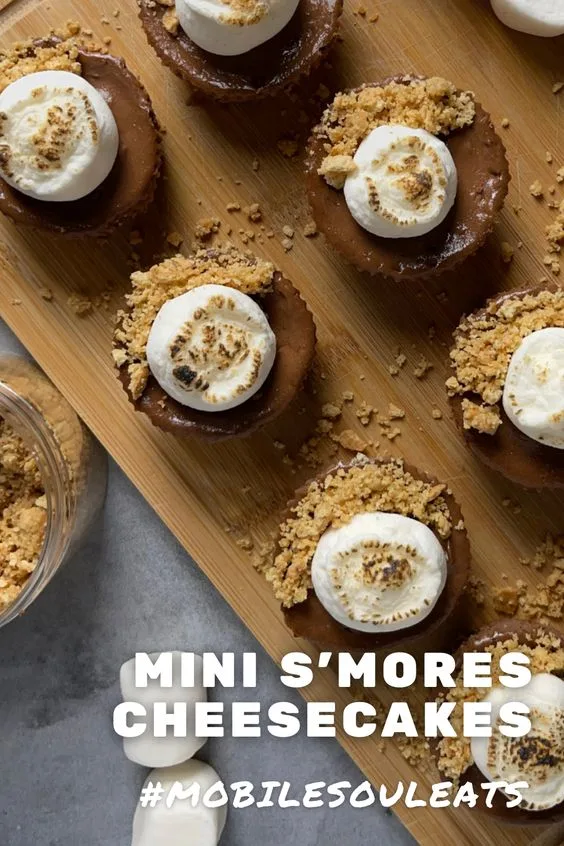
Cheesecakes come in all shapes, sizes, and flavors. This recipe for mini s’mores cheesecakes combines a creamy chocolate cheesecake base with a graham cracker crust and charred marshmallows to top it all off. If you are looking for a fun, stress-free, and delicious dessert. This is it. Perfect for getting the kids in the kitchen, for cute, camping-themed parties, or just for making it to the weekend.
Your grocery list
Dairy
- Cream cheese
- Unsalted butter
- Large egg
- Sour cream (light or full-fat – plain or vanilla Greek yogurt can also be used instead of sour cream)
Pantry items
- Graham crackers
- Powdered or regular granulated white sugar (powdered sugar in mini cheesecakes, because it needs less time to incorporate and melt into the batter. Using granulated sugar, may result in some grains in the finished cheesecakes)
- Vanilla extract
- Melting chocolate bars (unsweetened cocoa powder can also be used)
Other
- Regular-sized marshmallows
Equipment/tools you’ll need
- Mixing bowls
- Food processor or ziplock bag and rolling pin (for crushing up graham crackers)
- Stand mixer or hand mixer
- Measuring cup/spoons
- Muffin tin
- Cupcake liners
- Kitchen torch, lighter or gas stove, and tongs (to torch marshmallows)
What’s the difference between melted chocolate and cocoa powder in baked goods?
Melted chocolate and cocoa powder can both be used to add chocolate flavor to a cheesecake, but they have different properties that can affect the final product. Melted chocolate adds richness, moisture, and a smooth texture, while cocoa powder adds intense chocolate flavor and color without adding moisture or fat. When substituting one for the other, it’s important to consider the differences in texture and fat content.
For example, using melted chocolate instead of cocoa powder may make the cheesecake denser and richer, while using cocoa powder instead of melted chocolate may result in a drier texture.
How to melt chocolate on the stove vs. in the microwave
Melting chocolate on the stove usually involves something called a double boiler.
A double boiler is a kitchen tool used for gentle heating, especially for foods that can easily scorch or burn. It consists of two pots, one of which fits inside the other. The bottom pot is filled with water and the top pot is where the food is placed. As the water in the bottom pot heats up, the steam heats the top pot, melting the chocolate or heating the food evenly.
If you don’t have a double boiler, you can make one by placing a heat-safe bowl over a pot of simmering water, making sure the bowl doesn’t touch the water. Just make sure the bowl is stable and won’t tip over.
Double Boiler Method:
- Fill a small pot with a few inches of water and bring it to a simmer.
- Place a heat-safe bowl on top of the pot, making sure it’s not touching the water. This is your makeshift double boiler.
- Break the chocolate into small pieces and place them in the bowl.
- Stir the chocolate occasionally until it’s melted and smooth.
If you want to use the microwave to melt your chocolate, it can be done! Just follow these steps.
Microwave Method:
- Break the chocolate into small pieces and place them in a microwave-safe bowl.
- Microwave the chocolate on high for 30 seconds.
- Take the bowl out of the microwave and stir the chocolate.
- Continue microwaving in 15-second intervals, stirring in between, until the chocolate is melted and smooth.
Why do people sometimes add flour to cheesecake?
Flour is sometimes added to cheesecake recipes to help bind the ingredients together and create a denser texture. It can also help prevent cracks from forming on the surface of the cheesecake. The addition of flour can also help make a cheesecake more stable and less likely to collapse or become too runny. However, not all cheesecake recipes call for flour, and it can depend on the specific recipe and desired outcome.
Tips for making perfect mini cheesecakes
Mini-cheesecakes are a delicious and easy-to-make dessert that’s perfect for parties or gatherings. Here are some tips for making perfect mini-cheesecakes:
- Use room temperature ingredients: Make sure that all your ingredients, especially the cream cheese, and eggs, are at room temperature. This will ensure that they blend together smoothly and create a creamy filling.
- Use a muffin tin with liners: Mini-cheesecakes can be tricky to remove from the pan without breaking, so it’s best to use a muffin tin with liners. This will help you easily remove the cheesecakes from the pan without any damage.
- Press the crust firmly: Make sure to press the crust mixture firmly into the bottom of each liner. This will help create a solid base for the cheesecake and prevent the filling from seeping through.
- Blind-bake the crusts (OPTIONAL): f you plan on serving the cheesecakes without the cupcake liners, blind-baking (pre-baking) the graham cracker crust before filling and finishing the cheesecakes is recommended. Bake in a 300-degree Fahrenheit oven for 5-10 minutes. Let it cool then start filling with the cheesecake batter.
- Don’t overfill the liners: It’s important not to overfill the liners with the cheesecake filling. Leave some space at the top so that the cheesecakes have room to rise and settle without overflowing.
- Bake at a low temperature: Bake the mini-cheesecakes at a low temperature, around 325°F, for about 20-25 minutes. This will help prevent cracking and ensure that the cheesecakes cook evenly.
- Let them cool completely: Once the mini-cheesecakes are done baking, let them cool completely before removing them from the muffin tin. This will help them set properly and prevent any breakage.
Overall, making perfect mini-cheesecakes is all about using room-temperature ingredients, pressing the crust firmly, not overfilling the liners, baking at a low temperature, and letting them cool completely. By following these tips, you’ll be able to create delicious and beautiful mini-cheesecakes every time.
Can I use this recipe to make a full-sized cheesecake?
Absolutely! The process is pretty much the same. You will need to increase the ingredient measurements to make a taller, more traditional cheesecake.
There is an important difference though. The tops of regular-sized cheesecakes run the risk of cracking. Don’t get me wrong, they still taste wonderful, but the culinary world has decided that cracked cheesecake tops mean they weren’t baked “properly”. Just FYI.
A cracked cheesecake top usually means one of two things: (1) it was baked at too high of a temperature or (2) it was cooled too quickly. Basically, a rapid temperature change in either direction may cause the top of the cheesecake to crack.
That’s why it is recommended that you use a water bath when baking larger cheesecakes. The water heats and bakes the cheesecake more gently.
To create a water bath, you don’t need anything fancy. You just need a roasting pan or cake pan that is larger than your springform/cheesecake pan. If you’re paranoid about the seal on your springform pan like I am, wrap the bottom of the pan with 2 or 3 layers of aluminum foil. Place the wrapped pan inside the larger pan and carefully pour water into the larger pan. Pour water until it reaches almost halfway up the side of the springform pan. Be sure to avoid pouring any water into the aluminum foil. This may creep into the springform pan and make your crust soggy.
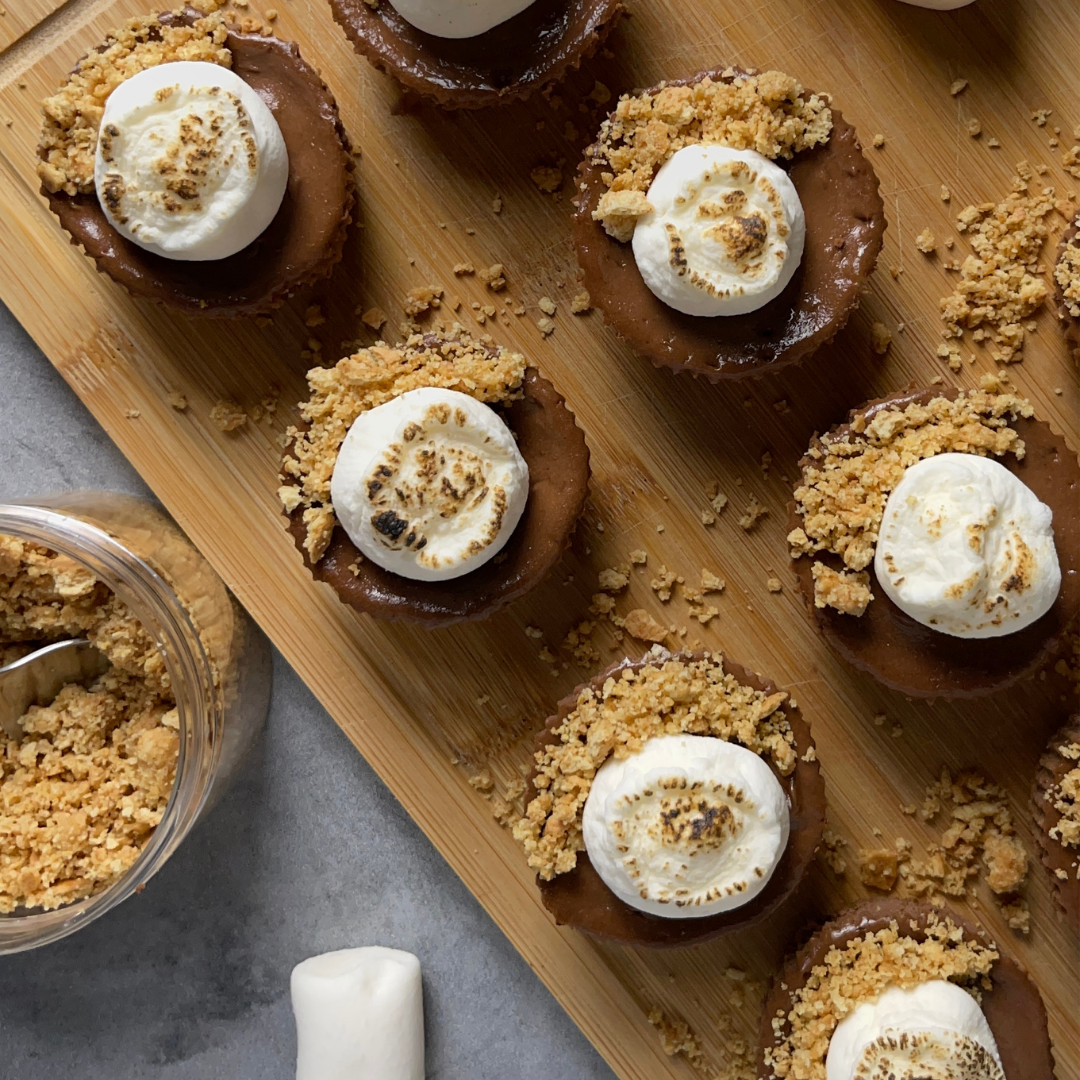
Mini S’mores Cheesecakes
Equipment
- Mixing bowls
- Food processor or ziplock bag and rolling pin for crushing up graham crackers
- Stand mixer or hand mixer
- Measuring cup/spoons
- Muffin tin
- Cupcake liners
- Kitchen torch, lighter or gas stove and tongs to torch marshmallows
Ingredients
CRUST
- 1 cup graham cracker crumbs, about 14 crackers, divided
- 2 tablespoons white sugar
- 4 tablespoons unsalted butter, melted
FILLING
- 16 ounces cream cheese, softened to room temperature
- ½ cup white sugar
- 3 milk chocolate melting bars, or dark chocolate or 6 tablespoons natural unsweetened cocoa powder
- ¼ cup sour cream
- 1 teaspoon vanilla extract
- 2 large eggs
- 12-14 marshmallows, regular-sized
Instructions
Prepare cheesecake crust and filling
- Preheat the oven to 325 degrees Fahrenheit. Use a food processor to crush the graham crackers into very fine crumbs. Melt butter and combine with the graham cracker crumbs in a mixing bowl until thoroughly combined. Set aside.
- Add melting chocolate (broken into large chunks) to a microwave safe bowl and heat until melted, 20 seconds at a time. Let the chocolate cool for 2-3 minutes before proceeding.
- In another mixing bowl, combine the softened cream cheese, sugar, sour cream, melted chocolate, eggs, and vanilla extract until smooth.
Assemble and bake
- Prepare muffin tin by adding a cupcake liner to each well. Use nonstick spray to keep the crust and cheesecake from sticking to the cupcake liners.
- Scoop about 2 tablespoons of the graham cracker mixture into each cupcake liner and press into the bottom to form the mini cheesecake crust. Pour enough cheesecake filling into each cupcake liner to fill it ¾ of the way full.
- Bake for 30 minutes or until a toothpick inserted comes out mostly clean. The cheesecake will continue to bake and set as it cools.
Decorate
- Let the mini cheesecakes cool completely before decorating them. Spread a jumbo sized marshmallow and use a torch or lighter to char the marshmallow slightly. Top each cheesecake with a charred marshmallow. Use a spoon to carefully sprinkle a little of the remaining graham cracker crumbs around half of the marshmallow.
Notes
- Add a splash of brewed coffee to the cheesecake filling for another interesting flavor
- Instead of melting chocolate for your cheesecake filling, cocoa powder can be used instead


Leave a Reply