
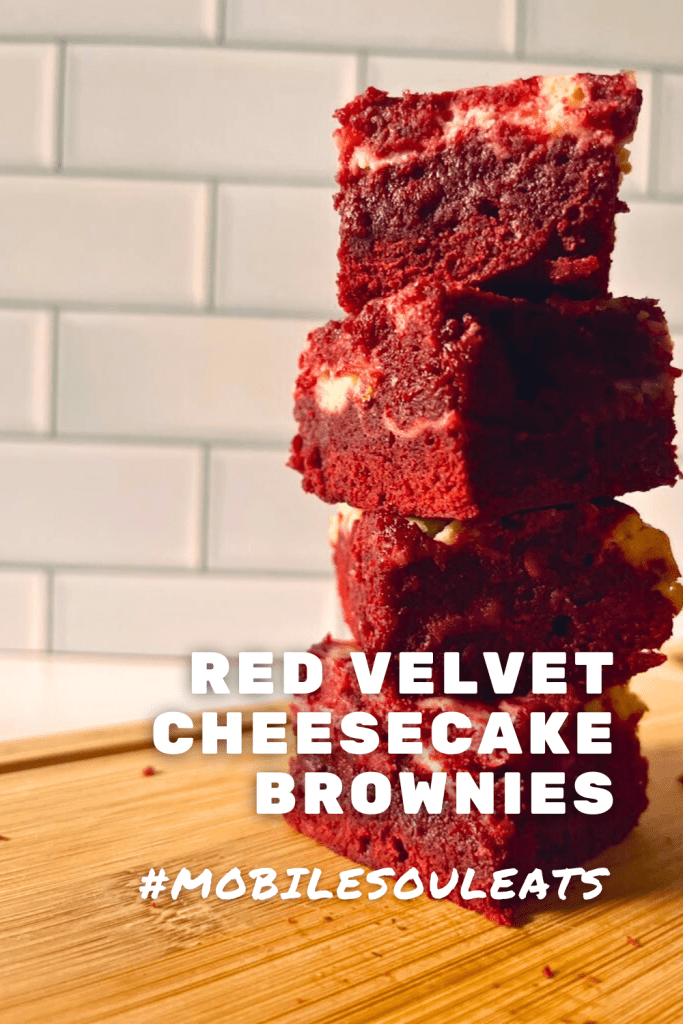
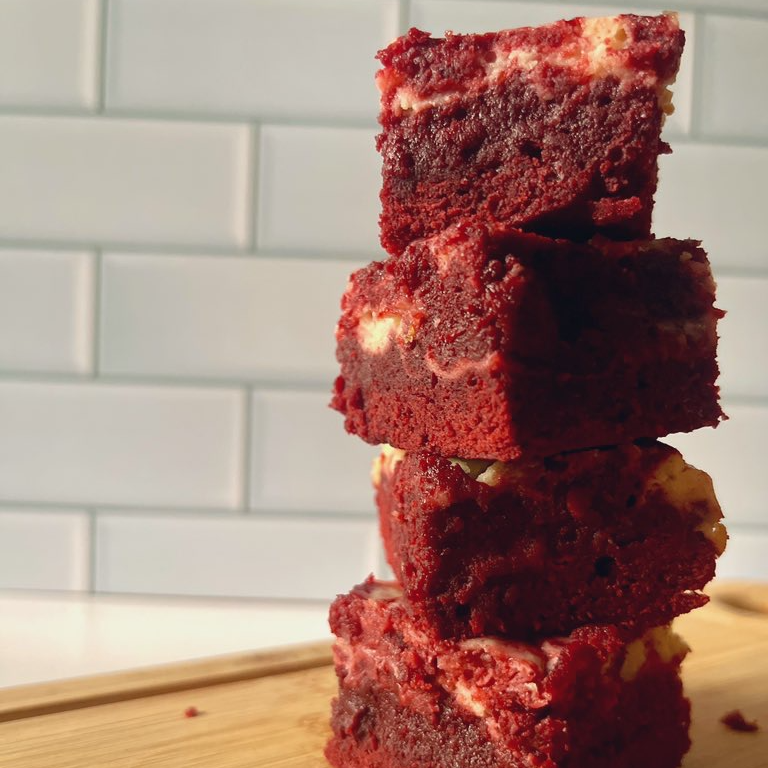
Red velvet cake is a staple for Juneteenth celebrations, but this year I wanted something a little different. These red velvet cheesecake brownies have the red velvet cake flavor, the fudginess of a brownie, and the tart creaminess of the cream cheese frosting.
Your grocery list
Dairy
- Unsalted butter
- Cream cheese (either full-fat or low-fat)
- Eggs
Baking and pantry items
- Unsweetened cocoa powder
- Granulated sugar
- All-purpose flour
- Kosher salt
- Red food coloring (gel, if possible – to avoid adding excess liquid to the batter)
- Apple cider vinegar or distilled white vinegar
Equipment/tools you’ll need
- Mixing bowls
- Whisk or electric mixer
- 8×8″ baking pan
- Rubber spatula
- Parchment paper (optional, but recommended to lift baked brownies out of the pan and reduce clean-up)
Step-by-step instructions for making red velvet cheesecake brownies
1. Make the red velvet brownie batter
- Method 1: Melting butter in double-boiler – To create a double boiler, you just need a pot of water over medium heat and another metal or glass bowl to sit on top. This helps whatever you’re melting melt more gently without breaking down.
- In this case, add butter and allow it to melt about half way before adding cocoa powder, vanilla extract, and salt.
- After the chocolate sauce is mixed well, add sugar and stir until the sugar is completely dissolved.
- Method 2: Melting butter in microwave – In a microwave-safe bowl, melt butter for 30 seconds. Add cocoa powder, vanilla extract, and salt and heat for 30 seconds until the butter is completely melted. Stir to combine then add sugar and stir until the sugar is completely dissolved.
- After the chocolate sauce has cooled, add 2 eggs, vinegar and red food coloring (gel). Whisk until well combined, but try not to do any excess whisking.
- Add flour and fold into the chocolate mix until there are only a few streaks of flour left showing. Be careful to not overmix the batter – this adds extra air into your brownie batter that will make the end result more like cake than brownies.
2. Make the cheesecake mix
- Add the softened cream cheese with sugar, 1 egg, and vanilla extract to a bowl. Use a whisk or electric mixer to blend until smooth. Scrap the bottom and the sides of the bowl as needed.
3. Assemble and bake!

Tips for making great red velvet cheesecake brownies
Red velvet cheesecake brownies are such a delightful treat! Here are some tips and tricks to make them absolutely scrumptious:
- Use good quality cocoa powder and fresh eggs for the best flavor.
- Don’t overmix: When combining dry and wet ingredients, mix just until combined to keep the brownies fudge.
- Make your cream cheese is at room temperature to avoid lumps and ensure a smooth filling.
- Pour half of the brownie batter into the pan, layer with the cheesecake mix, and then top with the remaining brownie batter. This creates a stunning layered effect.
- To achieve beautiful swirls, drop spoonfuls of cheesecake batter onto the brownie layer and then use a knife or skewer to gently swirl them together. Don’t overdo it; you want defined swirls, not a completely blended mixture.
- Vanilla extract or a hint of almond extract can elevate the flavor of the cheesecake layer.
- Use gel food coloring for a vibrant red hue in the red velvet brownie layer. Don’t skimp on it!
- Line your baking pan with parchment paper for easy removal and clean-up.
- Check for doneness: The edges should be set and the center slightly jiggles. Remember that brownies continue to cook a bit after you take them out of the oven.
- Allow the brownies to cool completely, then chill in the fridge for a couple of hours before cutting. This helps them set up nicely and makes for cleaner slices.
- Dust with powdered sugar or drizzle with chocolate ganache for an extra touch of elegance
How to store red velvet cheesecake brownies
Once cooled, store the brownies in an airtight container or ziplock bag in the refrigerator for up to 3-4 days.
Ways to adjust your red velvet cheesecake brownies
- Experiment with different food coloring intensities to achieve your desired shade of red OR play with different colors entirely
- Play around with patterns, swirls, and levels of manipulation when creating the marbled effect in your brownies.
- Fold chocolate chips into the batter for even more chocolate-y flavor.
- Top the finished brownies with white chocolate shavings.
- Add a swirl of raspberry or strawberry puree to the cream cheese layer for a fruity twist.
Remember, baking and desserts are all about having fun and expressing your love through food – there is little to no nutritional value so the value is all in how much joy it brings you and those you share it with. So don’t stress if your swirls aren’t perfect – each brownie is unique, just like you! And hey, if you’re feeling adventurous, why not experiment with different food coloring shades? Can you imagine green or purple velvet cheesecake brownies? Show me, if you ever make them. Happy baking, friends!
Equipment
- Mixing bowls
- Whisk or electric mixer
- 8x8" baking pan
- Rubber spatula
- Parchment paper (optional, but recommended to lift baked brownies out of the pan and reduce clean-up)
Ingredients
Red Velvet Brownie Batter
- ½ cup unsalted butter, melted (115g)
- 3 tablespoons unsweetened cocoa powder (20g)
- ¼ teaspoon salt
- ¾ cup sugar (about 175g)
- 2 large eggs
- ¾ teaspoon vanilla extract
- ½ teaspoon apple cider vinegar optional
- 2-3 teaspoons red food coloring gel is recommended
- ⅔ cup all-purpose flour (95g)
Cream Cheese Layer
- 8 ounces full-fat cream cheese (225g, room temperature)
- ¼ cup sugar (50g)
- 1 large egg
- ½ teaspoon vanilla extract

Instructions
- Preheat oven to 350°F/180°C. Line an 8×8-inch pan with parchment.
- Brownie batter: Microwave butter, cocoa, and salt in 30-second bursts, stirring between. Mix in sugar, eggs, vanilla, and vinegar. Add food coloring to desired shade. Fold in flour. Set aside ⅓ cup batter, pour rest into pan.
- Cheesecake batter: Beat cream cheese and sugar until smooth. Add egg and vanilla, mix well. Dollop over brownie batter.
- Spoon reserved brownie batter on top. Swirl batters with a knife for marbling.
- Bake 25-30 minutes until cheesecake is set and toothpick comes out with moist crumbs. Cool completely, then chill 2+ hours until firm. Lift out with parchment and cut into squares.
Notes
- Ensure your cream cheese and eggs are at room temperature for a smoother cheesecake layer. This helps achieve a creamy texture without lumps.
- Food Coloring: If you're going for a vibrant red color, gel food coloring is the best choice, as it doesn’t add extra liquid to the batter. You can adjust the amount based on your preference for color intensity.
- Swirling Technique: When swirling the batters, try to create a figure-eight motion with the knife to get a beautiful marbling effect without overmixing.
- Baking Time: Ovens can vary, so start checking for doneness a few minutes before the minimum baking time. Look for the cheesecake to be set but still slightly jiggly in the center.
- Serving Suggestions: These brownies pair wonderfully with a dollop of whipped cream or a scoop of vanilla ice cream. A drizzle of chocolate or cream cheese frosting can also elevate the presentation!
- Customization: Feel free to add chocolate chips to the brownie batter or a sprinkle of sea salt on top before baking for an extra flavor dimension.
Storage Tips: To keep them fresh, store the brownies in an airtight container in the fridge. You can also freeze them for up to 2 months—just thaw in the fridge before enjoying! - Garnishing: Consider topping the brownies with crushed walnuts or pecans for a crunchy contrast to the creamy layers.Store in fridge up to 5 days. They're even better the next day!